Written by WSMTA Member Sarah Silvia, NCTM
What do you need to get started?
- An internet connection
- A device with sound and a camera. A smartphone, a tablet, a laptop, or a desktop computer that can be moved into your studio would all work.
- A “platform”. This could be Skype, Facetime, Zoom, Google Hangouts, or something else. This will be like your online telephone company, and it connects your video and sound to your student’s video & sound.
Everything after this point is optional! My goal today is to talk through what I have done, show you some photos of what I’ve used this week, and then to share the communications I’ve sent to my students. To start things off, I’ve taught Skype lessons for a couple of years now. Whenever it snows, or when a parent has an illness, a Skype lesson means that I can continue teaching with no need for a makeup lesson. Practically, this means that nearly my entire studio has already experienced an online lesson.
Your Internet Connection
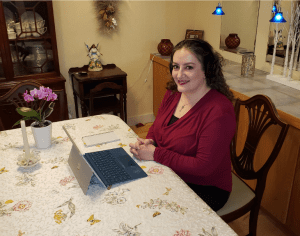
Three years ago we moved into a bigger house. That’s been nice, but it’s meant that our wifi has strong and weak spots throughout the house. You can see your wifi strength with an icon that looks like ¼ of a radius. The more “rings” in the radius slice are highlighted, the stronger your wifi signal. Wired internet works even better than wireless! It’s just not an option for me at this time. I’ve known that I didn’t have strong enough wifi in my studio to teach there, so I had been teaching Skype lessons with my laptop, microphone, and headphones at my dining room table. You’ll notice I didn’t include a piano as a necessary item on the list of equipment you need! I’m comfortable singing a part that I want to be different, or I can clap a rhythm that I would like to change.
Another teacher mentioned to me that it is important to educated families about the total load on their internet during the lesson they have with you. If you can, try to limit how many folks at your home and their home are engaging in high-usage activities (streaming videos, playing games online). This will degrade the quality of the video lesson you’re able to have.
As I watched the coronavirus news unfold, I’ve been thinking about what I could do. Switching to online lessons was a way that I could help to keep my students from sharing illness with each other at this critical time. So, I spent a weekend researching, shopping, and experimenting, and then we switched to online lessons on Monday, March 9th.
My Shopping List
- A wifi booster for my music studio. I love it! Now I can teach online lessons from my piano, and it’s even better! I can demonstrate passages for students, all my books are in there, and it’s working even better.
- A good pair of headphones. If I’m going to do this for hours at a time, I want good sound. My next experiment is to try them plugged in to see if the sound quality improves. I did choose Bluetooth (wireless) headphones, but I want to try them plugged in to see if the difference is worth having the wire in front of me.
- I already had an external microphone. If you don’t have one, I’d strongly recommend it. It will improve the sound your students hear, which will help them feel like they’re getting a better lesson experience. You’ll see this over and over again in the emails to my students – I like the Samson go mic. It’s tiny, even cute, and at $29 is a medium sized investment.
- I prefer to have a copy of every book my students are working from. This part is optional, I suppose, but it means that you can say, “I’m on page 10, measure 5” and your student can do the same. I find it helps the lessons to flow more smoothly.
Video Call Options
Once I had the equipment I needed, I started researching online video call options. Many folks love to use FaceTime. I don’t personally have an iPhone, so this isn’t an option for me. I’ve been using Skype, and it’s functional, but I felt there was room for improvement. My ideal choice would be a free service that’s widely used, has comfortable user interface, can be used on a phone or a computer, and can be used by Apple/Android/Windows devices. Zoom.us (or the ZOOM cloud meeting app) meets those criteria. I’ve also been hearing about Google hangouts, but haven’t had a chance to try it out.
I have to say that I would rate Zoom very highly. I asked my mom (who is about 60) if she could be my guinea pig. Neither of us had ever used it before, and we were chatting online in just 10 minutes. She said that it was intuitive and comfortable to use. I’ve since used it to teach 25 lessons, and only 1 person couldn’t get it to work in 10 minutes time (when we switched to a Skype lesson. Having a backup plan gives you flexibility!). All of that said, I’d recommend signing up for their 30 minute training webinar. The one I took was convenient at 10:30 Pacific time, and gave a good introduction to how their service works, what features it has, and how to control the audio.
Once you’ve learned a bit about your platform of choice, I’d recommend practice calling a few people. You want to be sure that you know how to start a call (or meeting), how to end it, and how to adjust the audio settings so you can make the most of it. It turns out that just plugging a microphone into your laptop doesn’t mean that your laptop will use that microphone. This is usually easy to adjust in settings, but it can take time and practice to find those settings. In Zoom, the audio settings are located in the bottom left corner of your screen during a meeting. Next to the pictured microphone is an up arrow, and when you click on it, it will display speaker options (I select my headphones) and microphone options (I select the best quality microphone I have).
Online Teaching Setup
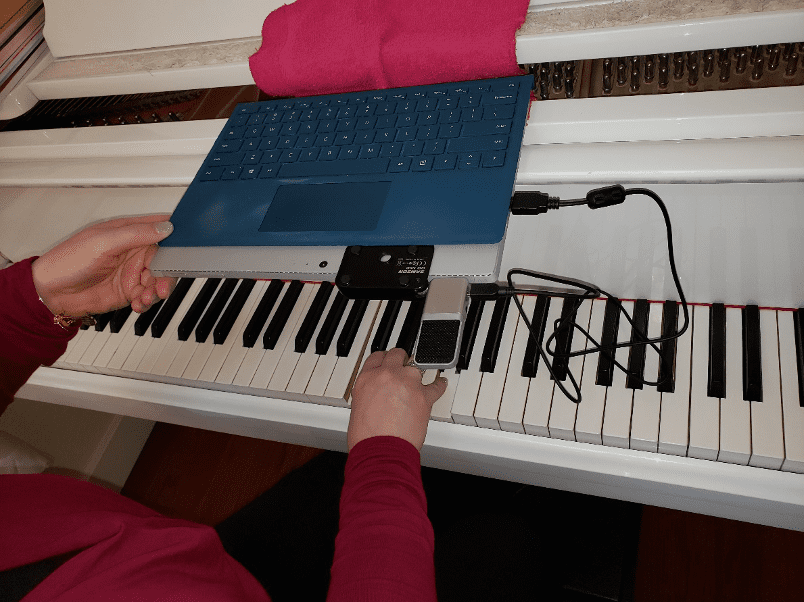
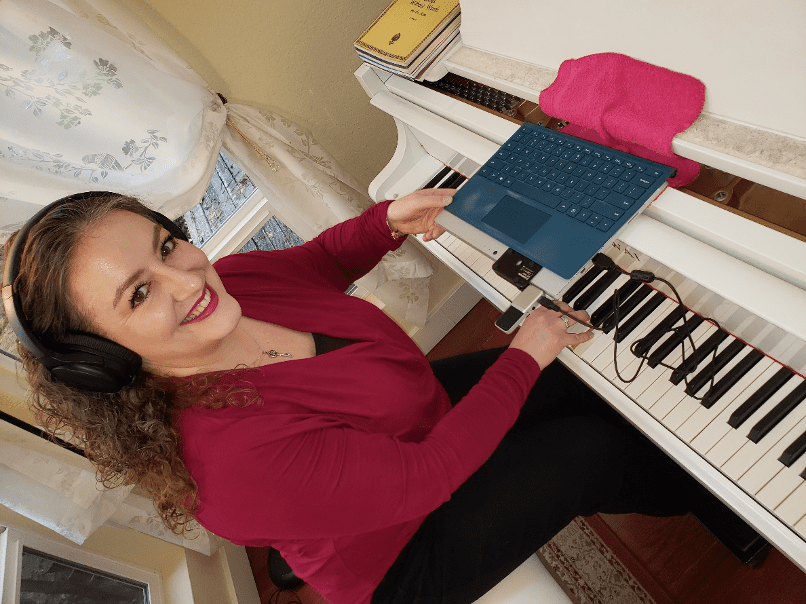
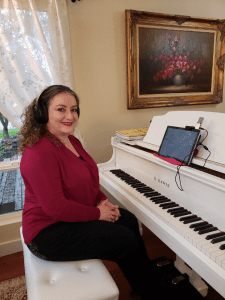
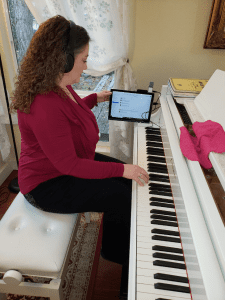
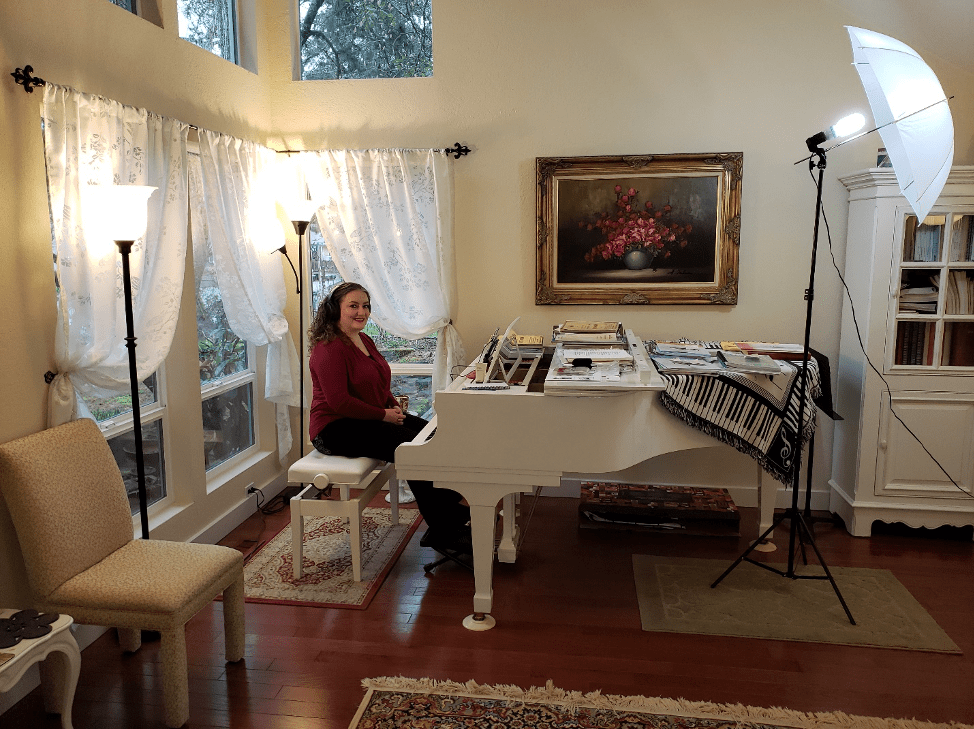
I’ve included some pictures to show my online teaching set up at this time. I like to place my tablet on my music stand. I know that a number of folks who are experienced online teachers will put it to one side for a profile view of their hands. My goal is to avoid twisting my back, so it’s mostly set up just to be in front of my face. If you look very closely, you’ll notice that I’ve tucked mine a bit lower down into my piano. I’m quite short, so this lets me fit more of my face onto my student’s screen. The pink cloth is there so that if I play a demonstration, there’s something cushioning the vibrations from going straight into the microphone and messing with the sound.
However, because it’s a tablet, I can pick it up and show a top-down view of the keys (great for showing which key to push down, or what is a half-step, etc).
I can also pick it up and hold it to one side if I want to demonstrate a particular gesture with my hands.
The original lamp placement in my studio was chosen to throw light onto the music rack from behind the pianist’s shoulders. That effectively puts my face in shadow while teaching. So, we’ve moved around some lamps. Yes, there’s umbrella lighting in the shot, because my husband has that from when he was filming some videos last year. But any lamp will do the trick!
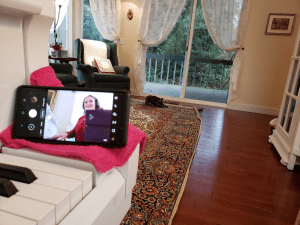
If you’re able, it’s tremendously helpful to show parents where to put a phone for a good visual angle. I’ve included a photo of my favorite place – to the right of the keys on that wooden block. I’ve been learning that putting a piece of fabric down between the phone and the piano improves the sound, so I recommend that. I’ve used a completely clean pink cotton washcloth in these pictures. I’ve also spent some time practicing with my students, asking them to turn to a random page in their book, and find a random measure number. This is often the most challenging part of teaching online – communicating about where a problem is, or where you would like a student to start. You will no longer be able to reach over and point to a spot on the music.
Other Considerations
If your student is very young – 1st grade, kindergarten, or even younger, you will probably have a more successful lesson if the child’s parent sits in on the lesson. They may need to repeat your instructions, “Miss Sarah said to play song #6. This one, right here.” One of my kids is working on tracking, and still needs someone to point to the notes while he plays from time to time.
I ask each student to get out their lesson notebook (or a piece of paper) and write out their own assignment for the week. Write today’s date down first! Then write which pages to practice, or which theory pages to complete. Have them write down their own practice instructions: practice line 3 extra, or clap & count, then play & count each line. Many of my students seem to be very excited about writing their assignments out!
Pack your patience, and assume that there will be hiccups. I would plan on losing 5-10 minutes of teaching time per lesson the first time that you teach online lessons. However, once that learning curve is over, it should drop down to a 1 minute gap between starting a call/meeting, and actually getting into the teaching. Very worst case scenario, you can try a phone lesson. I didn’t have a great experience doing this, but I’ve done it – the student put me on speakerphone, played his songs for me, then picked up the phone and asked what to change for the next week!
I have been trying to put an extra hour per day into my schedule in anticipation of “mystery challenges” and that might not have been enough time. I also planned on doubling my emailing time, and it’s been more like tripled. However, I think now that things are underway, I should be able to get back to a more regular teaching rhythm.
Your attitude will be important in all of this. If you can help your student to have a positive experience, they will be more comfortable and more willing to continue doing it. If you’re stressed out, etc, they might want to just go back to meeting in person. Do what you can to “sell” this as a strong possibility that’s a good solution.
Two pedagogical things that I have done differently:
I now have a list of which student is working from which book on which day. They’re stacked in order, with each weekday in its own stack. This will let me take Monday’s stack to the piano at the start of teaching, make sure each book is there, and then I can teach every student without needing to get up, find their book, and come back to the piano.
I have also started a teaching journal. I’m writing down each student and lesson day, and keeping track of anything I ask them to write down. I won’t have access to their lesson book next week, so I want to be able to look up what I asked them to learn or improve.
Things to consider in another week or two, when you have breathing room:
People enjoy having choices. This is true at any age! Just now, we are living in a time where all of us are experiencing less choice. You have a golden opportunity to give your students more choice! I usually save this idea for summer, but I will be inviting each student to pick any piece they wish to learn, and do something musical “just for fun”.
I will be spending tonight or tomorrow researching how to put on a digital recital. There are blogs about this, written by people who’ve done it before. Once I figure out how to do it, we’ll be putting one on for our local nursing home, the one that’s hosted our winter recitals the last two years. I’m going to let the kids go wild. They can include verbal messages, show off their artwork, introduce their family pets – whatever they want! They can also share an unlimited amount of music. Right now, most of my families are housebound, so they have a lot of extra time on their hands. I’ve pitched this idea cautiously to about a third of my students, and there has been enthusiastic, warm support in favor of this idea. I’ll be contributing a piece or two myself!